What Is Surfaces Across Google?
Surfaces across Google is a Google Merchant Center programme designed to allow retailers and owners of e-commerce websites to promote their products for free on Google properties such as the Google Shopping Tab, Google Search and Google Images.
If you have an e-commerce website, and not using Surfaces Across Google, you’re missing out!
Surfaces Across Google was introduced in 2020 and allows businesses to list their products on Google, for free. Previously the only way products could be listed on Google was by using a Google Shopping campaign or Smart Shopping campaign on Google Ads. As such, adopting Surfaces Across Google is a powerful tool to display your products to a larger audience of users who are searching for similar products on Google.
Surfaces Across Google can be implemented in less than an hour. Your account will be usually approved within 72 hours by Google, so long as you have all the required information and your products and website are compliant with Googles terms.
Your products can show up as either standard or advanced listings on Surfaces Across Google, with both having their own unique data feed requirements.
Below, we will give you the exact step-by-step guide of how to get your products listed on Surfaces Across Google in no time!
How Do I Sign Up For Surfaces Across Google?
The first step in registering your products to show on Surfaces Across Google is by signing up for a Merchant Center Account. To do this, visit Google Merchant Center
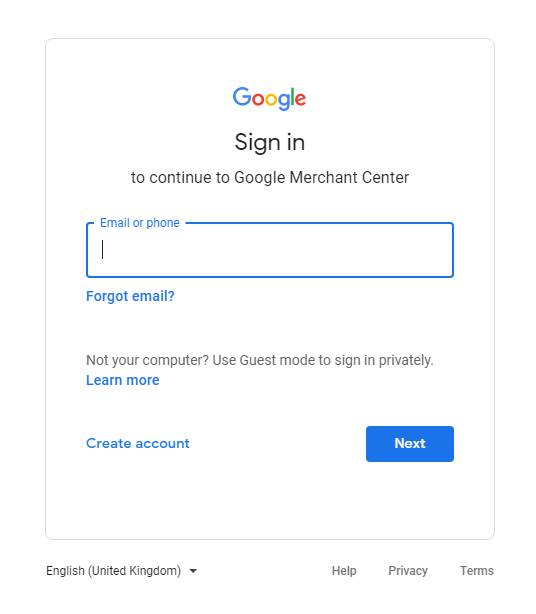
Once you’ve visited Google Merchant Center, click on “Get Started”.
Enter your email address, click “next”, and follow the steps to create your Google Merchant Center account.
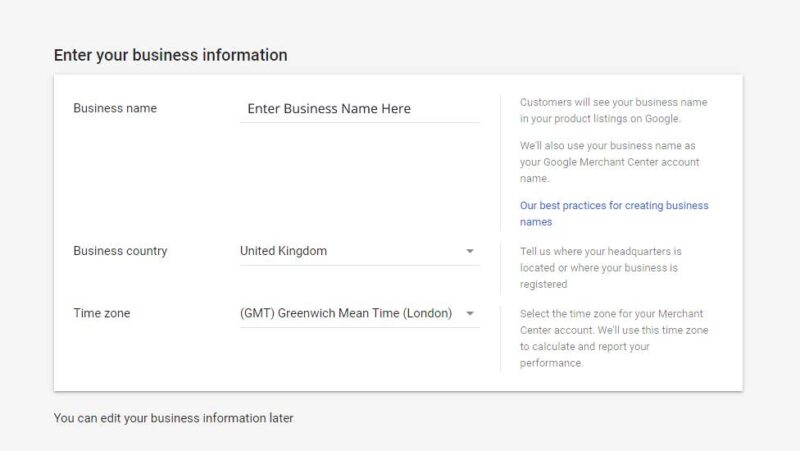
Once you have created your Google Merchant Center account you’ll be required to provide your business information. You should see the screen shown in the image below. Enter your business name, country, and time zone, and save your selection.
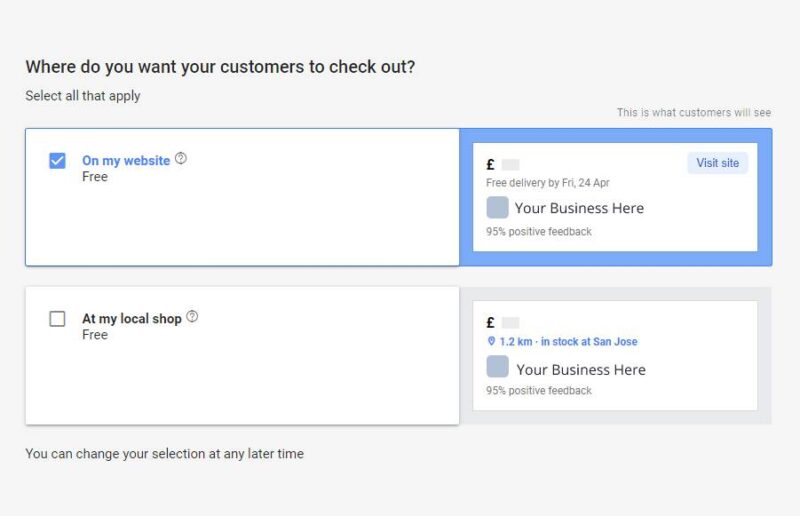
You will then be asked to select where you would like your customers to check out. Assuming you have an e-commerce website, you will want to select “On My Website”, however, if you also have a retail store and would like to sell products from there, you may also want to select “At My Local Shop”.
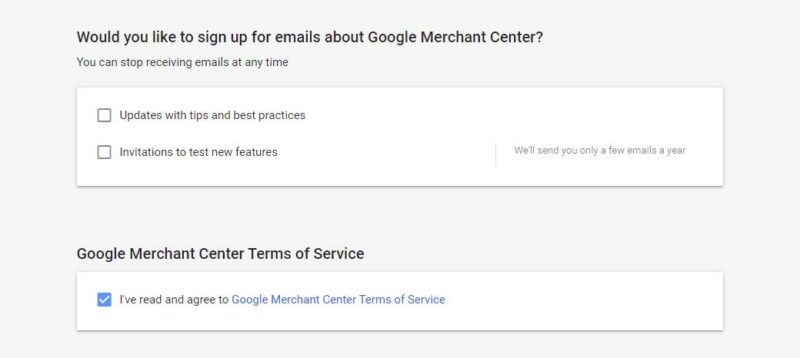
Once you have clicked to continue you will be asked to select your email preferences and agree to the Google Merchant Center Terms of Service. You may wish to read the Terms of Service to familiarise yourself with the rules when listing products on Google Merchant Center. If you wish to receive email updates about tips & best practices, as well as invitations to test new features, you will also want to tick those boxes.
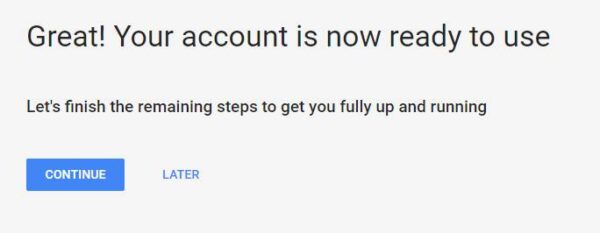
Once you have completed the all of the steps so far and confirmed that the information is correct, click continue to visit your Merchant Center Account.
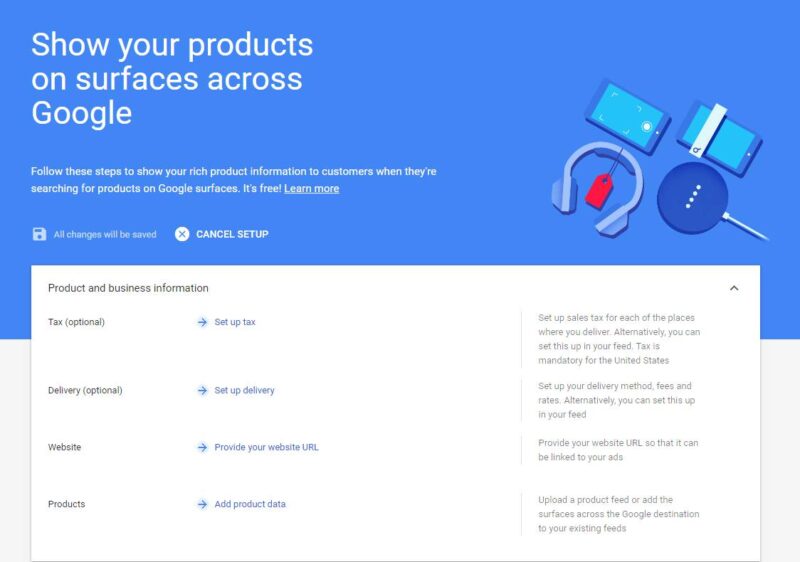
Now that your Google Merchant Center account is now set up, we still need to make a few changes before we will be eligible to appear on Surfaces Across Google. To appear on Surfaces Across Google you will need to complete your Product & Business Information settings. The Tax setting is only necessary for the USA, and delivery settings are optional, however, we recommend you complete as much of this information as possible to maximise the chance of your account being approved.
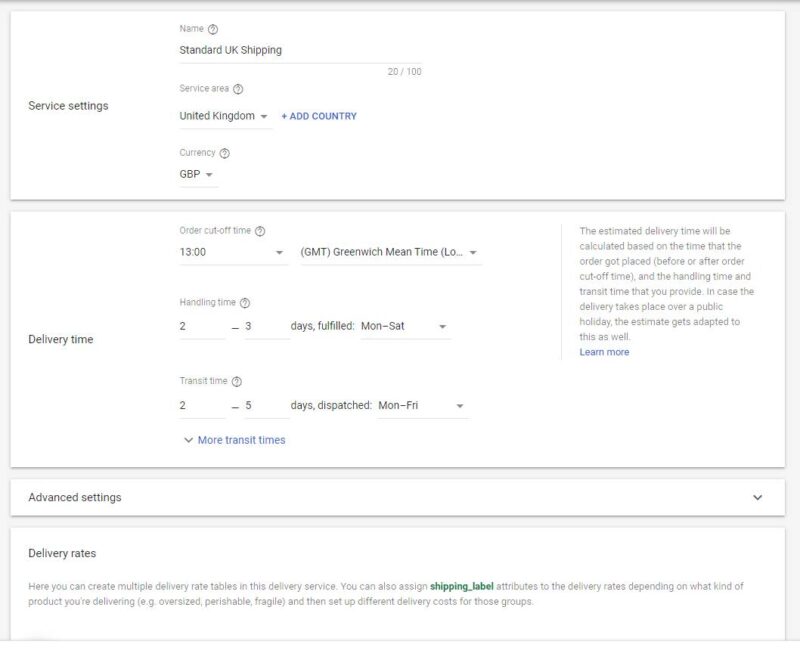
If you are offering delivery on your orders, you’ll need to configure your Delivery Service Settings. Apply a descriptive name for the delivery service that you’re creating, select the service area, and the applicable currency, in our example this is GBP. Once this is completed, we need to configure delivery times. These include the order cut-off time, handling time, and transit times.
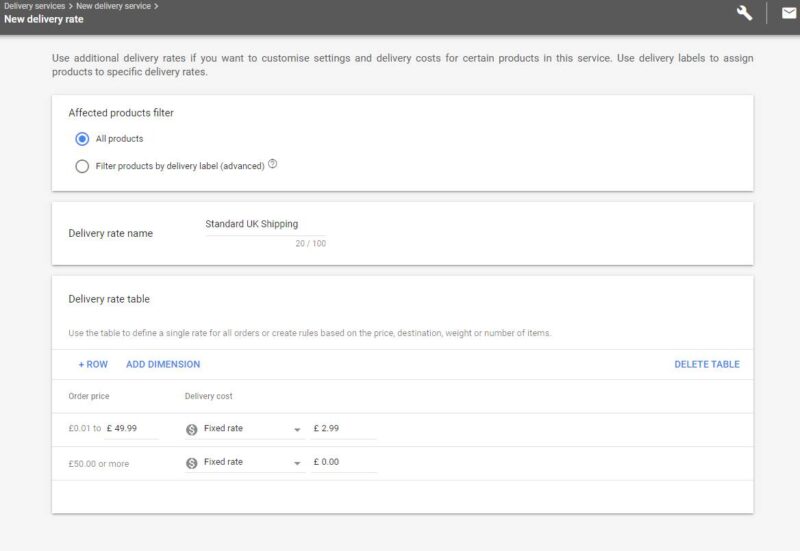
Once you have completed the delivery service settings, you will be prompted to create a delivery rate. This can be used to define a delivery cost by order price, order weight, or the number of items sold. In our example below, orders over £50, shipped to the UK, are eligible for free shipping. Orders under £50 have a fixed shipping rate of £2.99 per order.
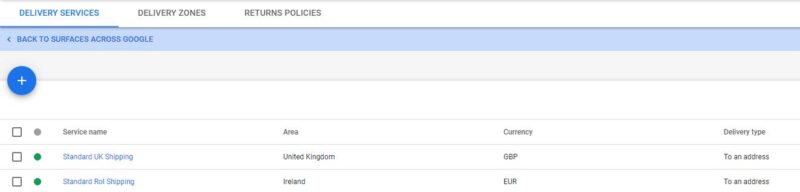
If you ship to different countries or regions you will need to repeat this step for any subsequent locations. In the example below, we have created two shipping services, one for the United Kingdom, and one for Ireland. In the United Kingdom, orders over £50 are shipped for free, and a flat £2.99 rate for under £50 order value. In Ireland, all orders have a flat shipping rate of £4.99.
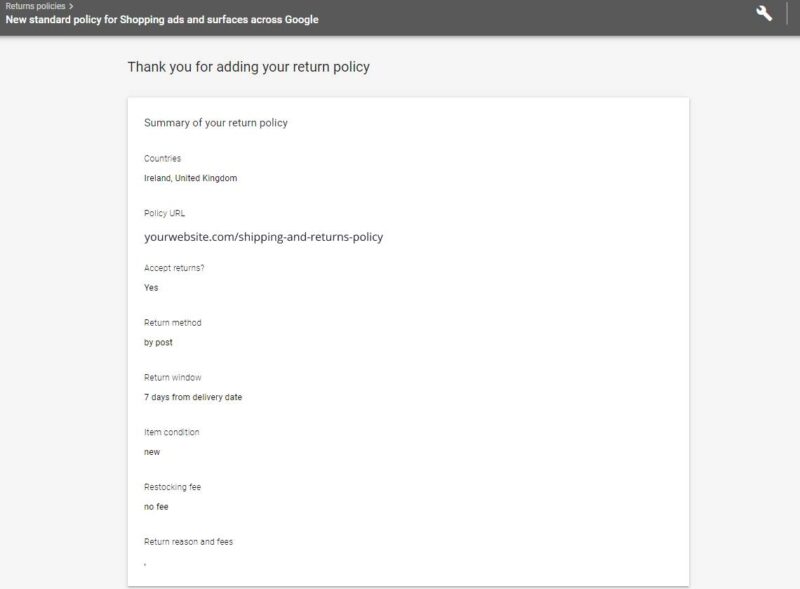
Next, we will want to skip across to “Returns Policies” on the right-hand side. Once here, we will want to click the blue button for “Add Policy”. Once you have done this, complete all the relevant sections. It will ask you the countries, your websites shipping & returns policy URL, whether or not you accept returns, the method for receiving returns, the return window, and restocking fees where applicable.
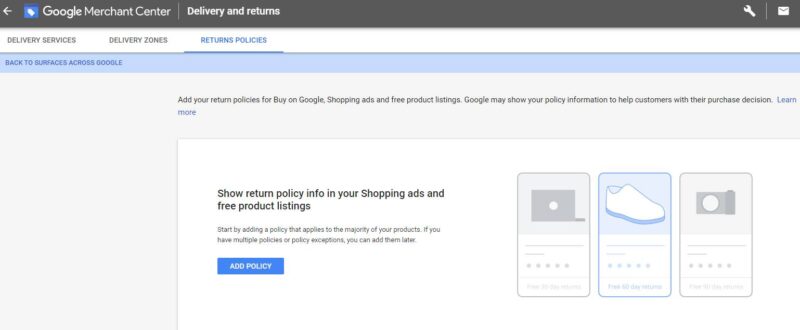
We now need to review and confirm our returns policy and click accept if all of the information is accurate.
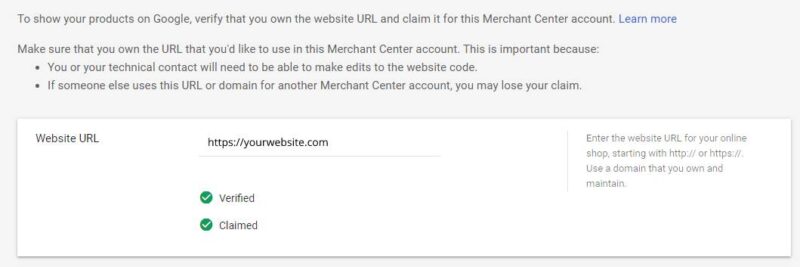
The last step of configuring our product and business information, before adding our products, is verifying and claiming your website. Fortunately, this is one of the quickest and easiest steps. To verify and claim your website URL, simply enter it, and click save, then click verify. Done, simples!
Adding Products on Google Merchant Center
Next, we must add products to Google Merchant Center. This could be a fast and easy process, or a rather time-consuming process, depending on how many products you have, and the content management system you’re using for your website.
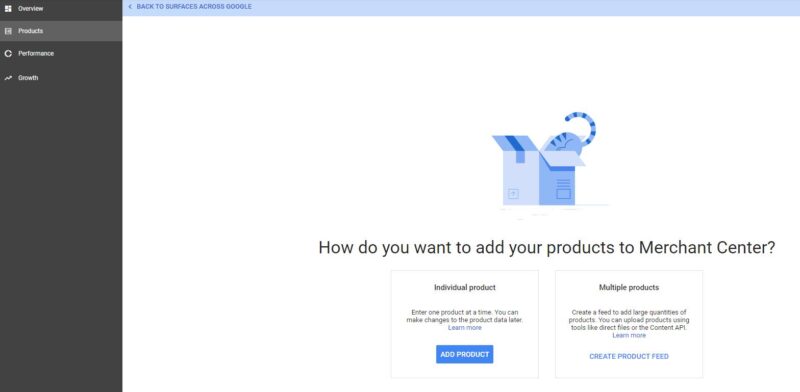
There are two options for adding products to Google Merchant Center, the first is by manually adding them one-by-one, and the second option is by using a product feed. Let’s go over how to add products manually first.
Manually Add Products on Google Merchant Center
On the products tab on Google Merchant Center, to manually add a product, click “Add Product” under where it says “Individual Product”.
Once here, you will see a number of fields to provide information, and images of your product. It’s recommended that you put as much relevant information into these fields as possible. Once you have completed this, you can save your product. If you sell a number of similar products, it’s possible to duplicate the product you have just created, meaning you will have fewer fields to complete the second time around. You will need to repeat this step until all of your products are now added to your Google Merchant Center account.

Listing Products Using a Feed on Google Merchant Center
Using a feed to update your products on Google Merchant Center can save you time. There are a few different methods to generate a feed; first, you can create it manually in a Google Sheets file, and upload this. Or, we can use a plugin or tool on our content management system. We recommend researching these to find the best option depending on your own circumstances. Some are free, some are paid, some are better for small numbers of products, and some are better for larger numbers of products. Your best bet is to head over to Google and search “Google Shopping Feed”+”WooCommerce/Shopify/Magento/Shopwired”, etc.
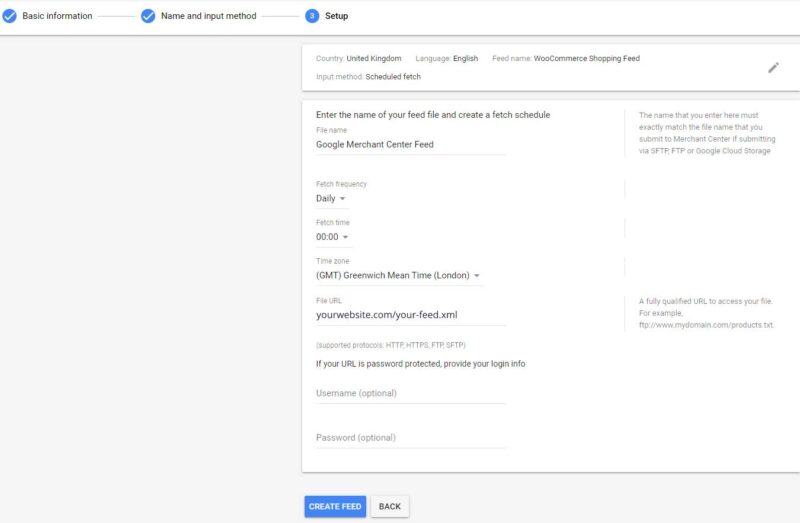
In the image below we have selected the option for Scheduled Fetch. With this option, Google will automatically pull information from your feed on a set schedule.

We have instructed Google to fetch our shopping feed, every day, at midnight. Make sure the time-zone is correct, and enter the URL for your newly created feed in the “File URL” box. If your feed requires a user name or password to access it, please include these in the boxes provided.
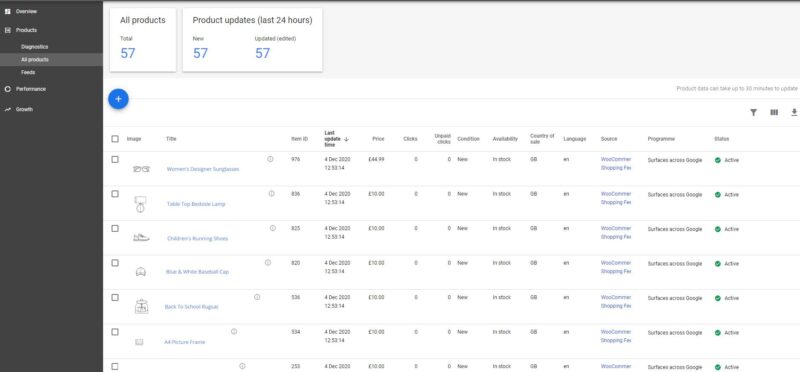
Once we create our feed, we can then head over to “All Products” and see that our images have added. We can see; their images, titles, ID, when they were last updated, price, number of clicks from Google Shopping, number of clicks from Surfaces Across Google, the condition, availability, country of sale, language, source, programmes, and status.
Activating Surfaces Across Google
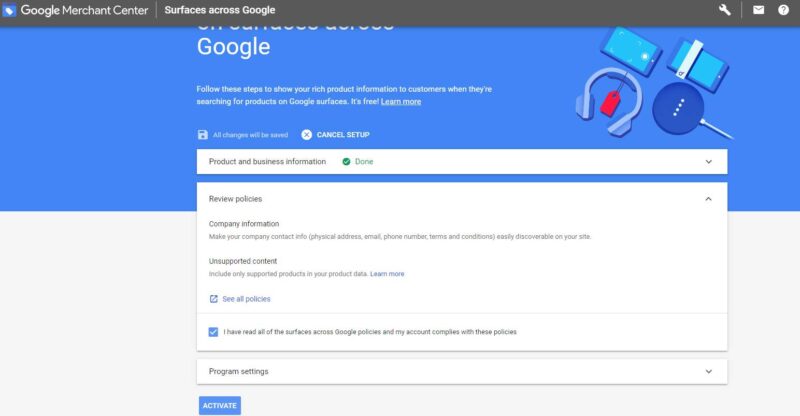
Once we have provided our products and business information, we are now able to activate Google Surfaces. For this, go back to the “Growth”, select “Manage Programs”, and visit the option for Surfaces, its title should read “List your online products for free”. Once here, you’ll need to confirm that you have read the policies and that your account complies, and click activate.
Following this, your account will be reviewed to ensure it complies by all the policies. This should take approximately 72 hours. If your review is successful, your products should begin to show on Google Search, Images & Shopping for free in no time!
If you need help getting started with Google Shopping, or Surfaces Across Google, Contact Us!


