What is a website migration?
A website migration occurs when a website owner decides they want to make a substantial change to the website, this could involve changing the website domain, moving to a new server or re-designing the website on a new CMS/technology stack, for instance, moving from WordPress to Shopify or from Magento to WordPress.
Website migrations can occur for a number of reasons but the one thing many website owners fear is the loss of search traffic and revenue, the internet is littered with horror stories of website migrations that have gone wrong.
One thing is for sure, migrations can be daunting and stressful. Here’s a list of things to check after you have migrated your website.
Make an annotation in Google Analytics
It’s considered best practice that if you’re going to make a sufficient change to a website that you make an annotation in Google analytics.
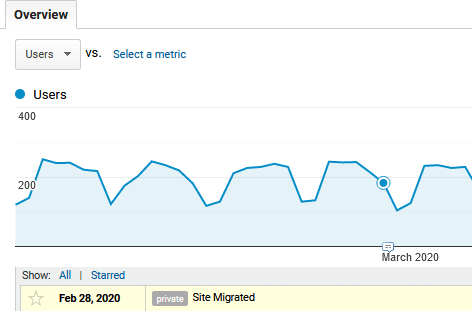
Adding annotations can help you monitor and compare the performance of your website after the migration. Including an annotation will allow you to measure trends, and better attribute any increases or decreases in metrics after the migration has occurred.
Ensure Google Analytics is still enabled
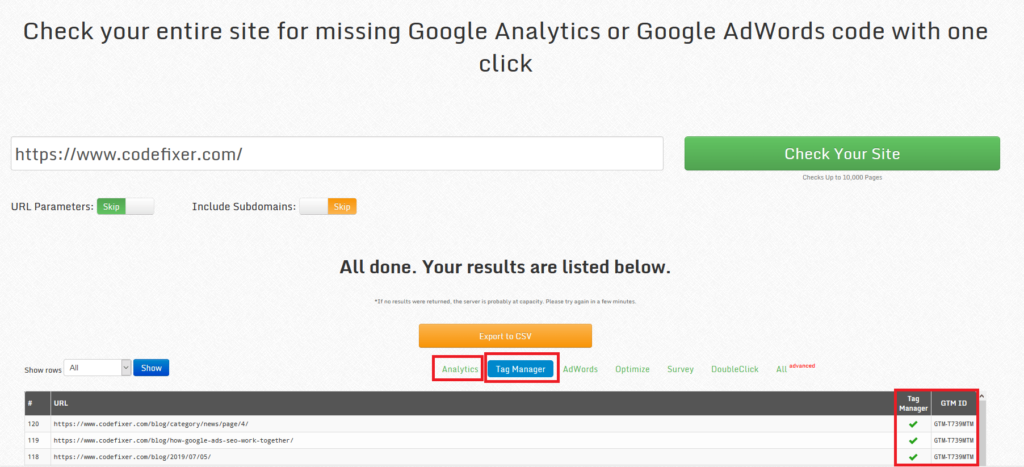
If you’re moving your website to a new platform it’s easy to forget to include the tracking code on the new platform. To ensure you don’t see your website traffic nose drive after the migration to the new platform double check that you have included the Google Analytics tracking code on the new platform.
The easiest way to check if your website is missing Google Analytics code is to enter your website URL into the following website:
This will scan your website for UA- or GTM- code depending on how you implemented Google analytics, it will then return every page that is being tracked.
Ensure 301 redirects are working
In most migration cases, redirects will be a part of the migration process whether that’s moving to a new domain, change in the URL structure, moving content to a new page or migrating from HTTP to HTTPS. All of these activities will involve the use of redirects.
The purpose of redirects is to inform search engines that the resource they are looking for has now moved to a different location. If not implemented properly search engines will serve a 404 page to visitors, which can lead to the loss of traffic, revenue and create a bad user experience.
If you are working with a WordPress website you’ll add your redirect rules to the .HTACCESS file on the website server. These rules will provide search engines with instructions to where they can find the updated URL.
Before launching, have your web developer double-check that all 301 redirects have been included in the .HTACCESS file. When the new site has gone live have your web developer again check the .HTACCESS file to ensure redirects are still in place.
You can also check redirects manually by simply visiting any old URLs and seeing if they redirect to the new location. You can also add a useful Google Chrome extension called Redirect Path which will show you the status code and the path of the redirection. Another option would be to have a URL mapping spreadsheet and copy all the old URLs into a program like Screaming Frog to see if they get redirected properly.
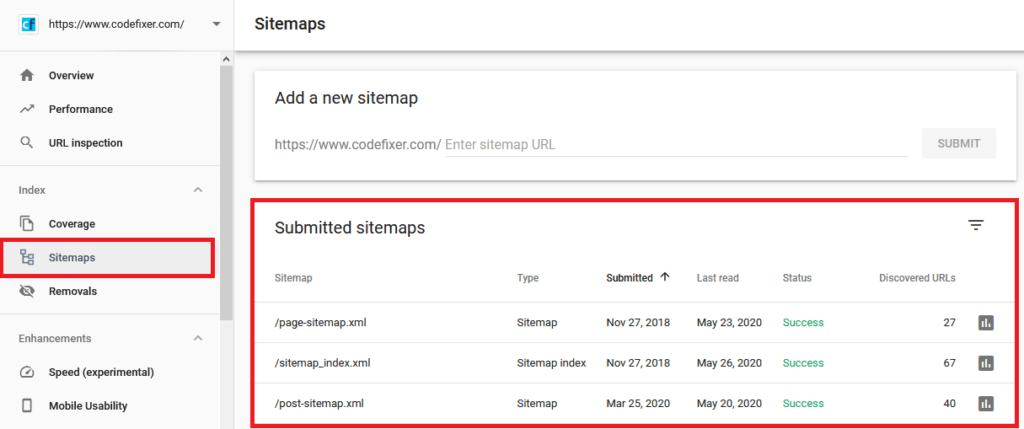
Ensure XML sitemap has been submitted to Google search console correctly
It’s important that during the migration stage you have made the old sitemap and new sitemap available to search engines, this will allow search engines to get a better understanding of the changes that have been made to the website.
Once you have successfully pushed the migration live, it’s important to go to your Google Search Console and submit the old sitemap along with the new sitemap, this will help search engines crawl and understand the redirects that have been put in place quicker.
Ensure search engines are crawling and indexing your website
If you’re redesigning your website, it’s common practice to add a disallow directive to the robots.txt file or no-index directive to the web pages of your development website to ensure search engines don’t crawl and index the website.
However, Google doesn’t always listen to the disallow directive when placed in the robots.txt file, other common practices used by web developers to prevent search engines from crawling your website is to add a password to the website or by adding X-Robots-tag headers to the .htaccess.
X-robots- tag reference > https://github.com/h5bp/html5-boilerplate/issues/804
The safest way to do this is to password protect the site and that’s what we’d recommend.
When your new website is ready to go live, make sure you double-check that the above measures on the development website have been removed, this will ensure search engines can crawl and index the website, you will find many horror stories online in which websites have forgotten to do this causing their website to disappear off search results weeks or months down the line. If you ever notice this, give the website owner a shout out.
After a website migration, you should perform a site operator search – site:example.com and regularly check that new URLs are being indexed correctly.

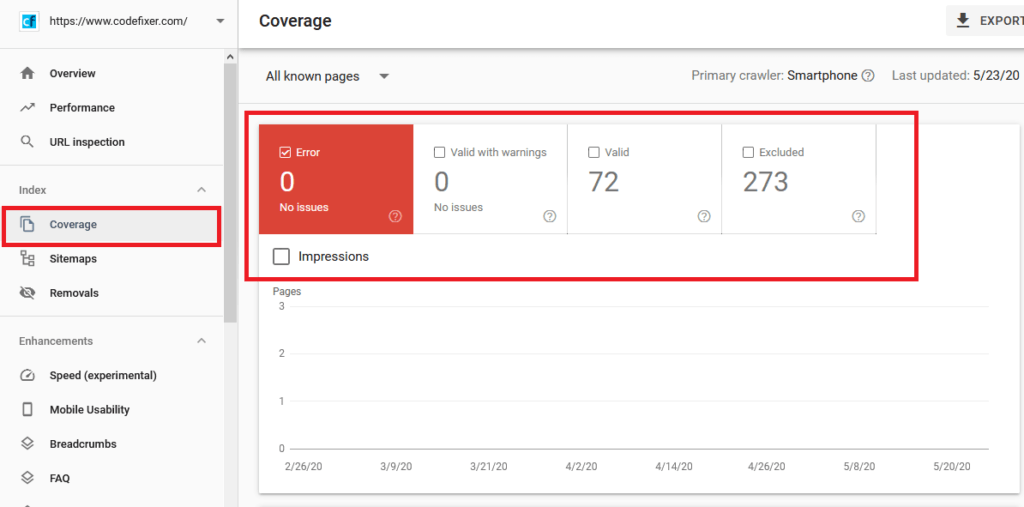
Performing a site: search isn’t always 100% reliable, so it’s also best practice to check the coverage tab in Google search console for a more accurate representation of what’s being indexed, this will also identify any crawl errors with guidance on how to fix them.
If you have successfully submitted the new sitemap to Google Search Console and have made sure to remove the measures to prevent your development website from being indexed, all new URLs should index without any problems. However, it can take time, so it’s important to check.
If you are facing issues with indexation, check the Index coverage status report inside Google Search Console. If there are any issues with indexation the coverage report will highlight any errors in red which you can then investigate further and fix.
Ongoing monitoring
It’s advisable that when you have carried out a migration of any type that you monitor the website daily for at least the next 2 – 4 weeks until the dust settles. By proactively monitoring the website you can quickly fix any issues that occur, this would involve monitoring keyword rankings, fluctuations in traffic, reviewing Google Search Console for any crawl errors, index errors or redirect issues.
Monitor keyword rankings
It’s important that before a migration happens that you benchmark your current keyword rankings especially for key landing pages. By doing so you will be able to see if any increases or decreases in rankings occurred after the migration.
If the worst-case happens and you see a decrease in rankings, you can then segment your organic traffic and review key landing pages to see if the drop in rankings was caused by the migration and which pages have suffered. However, it is important to note that keyword rankings do tend to fluctuate and any ranking drops may not be caused by the migration. It is a good place to start though.
Monitor Google Search Console
Check Google Search Console daily for any issues, Search Console will detect and report any crawl errors, indexation problems, manual penalties or security vulnerabilities and will include a guide on how to fix these issues. The quicker you review and fix the issues the better.
Monitor Google Analytics
We mentioned previously the importance of adding an annotation to Google Analytics on the day the migration is going to occur, we do this so we have a record of the migration date. If you begin to see massive drops in traffic after the migration then there is a good chance the drop in traffic is related to something that has gone wrong during the migration period.
It’s also important to check that any goals or events set up in Google Analytics prior to the migration are still being tracked after the migration period to ensure there are no gaps in the data.
Monitoring Google Analytics daily helps you can prevent and sort issues related to inaccurate data quickly.
Final thoughts
To ensure a migration goes smoothly it’s important to properly plan the migration, the lack of preparation is where migrations tend to go wrong.
Steps to consider before migrating:
Crawl website before migration
Crawl your existing website using Screaming Frog or Deep Crawl, this will allow you to identify any issues with the website that need to be fixed, any issues identified should be noted prior to the migration.
Benchmark key metrics
Before the migration you should make note of your current keyword rankings, traffic to key landing pages and the overall amount of traffic, this data can then be used to identify any difference in traffic after the migration.
Map out all redirects
Using a spreadsheet list out every URL that is currently listed on the website, if you’re planning on changing the URL structure of the website this is time to identify which URLs will be changing and setting up the appropriate redirect, failure to take this step into consideration will result in your website losing traffic and rankings.
Migrate website during non-business hours
If possible it’s better to do the migration during non-business hours, this will prevent any interruptions to visitors and allow any troubleshooting if things don’t go as planned.
Monitor closely
Only once you have carefully planned out the migration should you go ahead with the migration, too many problems occur when migration is rushed and not thought out.
Once the migration has been completed, it’s important to monitor the Google Analytics and Search Console daily for the next 4 weeks religiously, this will allow you to identify issues quickly and resolve them quickly.
Need assistance?
If you would like assistance in migrating your website, then our SEO services can provide the right guidance to ensure the migration goes as smoothly as possible.


